Mounting a projector screen on the ceiling is a bit tricky. Therefore, I have added easy methods to hang this screen from your ceiling in this detailed guide.
How to Mount a Projector Screen to the Ceiling? In general, you can mount a projector screen to the ceiling by deciding its exact location and drill holes to install its mounting brackets. Next, attach the projector screen to the brackets and secure it with bolts. Finally, attach the electric wires and connect them with the projector.
It takes around 5 to 7 hours to mount it properly and attach its wiring. If you are using the services of some professional, it will take less time.
Contents
- 1 How to Mount a Projector Screen to the Ceiling?
- 1.1 Determine the location for the screen
- 1.2 Location of Projector
- 1.3 Attachment of bolts and hooks
- 1.4 Installation of Projector screen
- 1.5 Use of stud sensor or magnets
- 1.6 Size of screen
- 1.7 Placement of mounting brackets
- 1.8 Attachment of projector with brackets
- 1.9 Connection with Electricity Supply
- 1.10 Adjust its settings
- 1.11 Secure the screen with bolts
- 1.12 Use of chain to hang a projector screen on the ceiling
- 1.13 Why would you mount a screen on the ceiling?
How to Mount a Projector Screen to the Ceiling?
Mounting projector screen on the ceiling is more beneficial than hanging them on the wall. It has a large white surface and can display a projected image that you can see.
Determine the location for the screen
You should place a screen of your projector in the right location for its proper working.
You should not fix it near open windows and doors because sunlight can damage its material and cause overheating.
You could not place the projector screen in front of your LED bulbs and tube lights because more radiance dulls the picture.
For better performance, close the doors, close your windows and cover them with curtains and turn off the light.
I always recommend installing it 3 to 5 feet above the floor for better visibility to everyone.
Location of Projector
The proper installation of the projector is also necessary for your display to work with significant quality. For correct visualization, place it on the opposite side and center of your screen.
The distance between the projector and its screen matters a lot for better image quality. If these are far from each other, then after zooming, the image’s pixel gets distorted and blur.
Many people complain that they can not focus on the image when the projector and its display are very near to each other.
Attachment of bolts and hooks
When you plan to buy a projector screen, you should access nuts and bolts on your ceiling.
You can use bolts, chains, snap-hooks, and L-shaped brackets to install your display primarily with your ceiling. These not only secure the device but looks good with their colors.
Installation of Projector screen
A beam is present on your ceiling to provides support to your building and prevents destruction during earthquakes.
These beams are of wooden material that lies in horizontal and vertical directions with studs or joists interconnect them.
You should not directly mount it on the drywall because drywall alone cannot bear the weight of your heavy device.
Instead, you need to add screws and bolts to fix them with mounting brackets where joists are present. It is better to properly fix and secure it with the bolts to prevent any damage.
Use of stud sensor or magnets
You use a stud sensor to determine the exact allocation of joists and studs to place screws there. You can also add a sensor in your android phones to sense a joists position.
You can use a ladder to sense the ceiling with the help of this sensor on your ceiling until it shows a red alert; this alert indicates the presence of ceiling joists.
You can also use high-intensity magnets because joists are of metal material, and they cause pulling force where they are present.
Size of screen
The ideal projector screen size ranges from 70 to 130 inches for its best viewing quality. If it is small and the picture displayed is large, it is not viewable properly.
If it is wider in size and the picture displayed on it is small, your audience finds it difficult to see the clear picture.
Therefore, you should always select its size according to your requirements and the size of your room.
Placement of mounting brackets
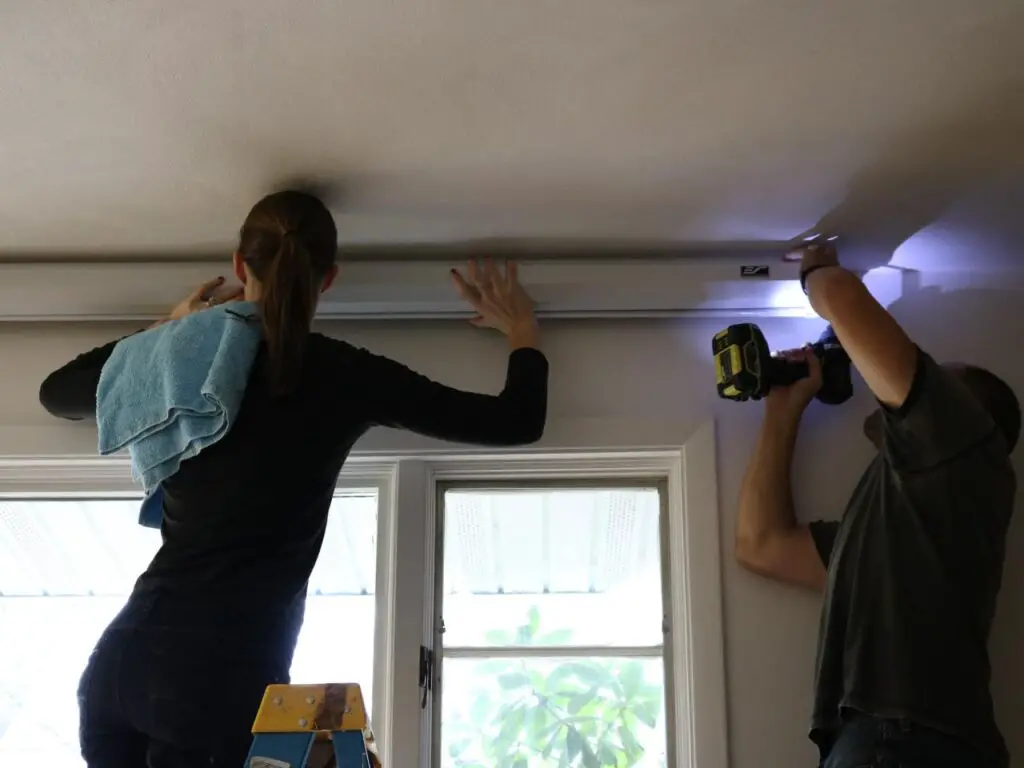
When you find the point where joists are present, mark these sites with a pencil or pen. Now hold your drill machine tightly and carefully for its straight penetration in the pointed holes.
After drilling, place your mounting brackets on the corresponding holes respectively. For anchoring purposes, you can use screws; they are come up with your projector’s kit.
Use them to fix the bracket with the ceiling joist and tight them by using a screw wrench carefully so they can hold the weight of your projector.
Attachment of projector with brackets
Now you have to mount its display in the brackets; two persons can hold it from both sides then, with the help of stools.
Then place its hooks in the mounting brackets and tight both sides by using screws. If you clench it loosely, your device may fall off, and scratches come on it.
Connection with Electricity Supply
After placing its display in its place, now turn it on with the help of a proper electricity supply.
To power on, connect its switch with the socket and turn on its power button. Now your display is ready, and you can enjoy whatever you want to see in it.
You should understand the wiring of your electrical equipment to prevent any damage.
I recommend using high-quality products, including wires. If the electric socket is not near, you can use the extension wire.
Adjust its settings
During the installation process, fingerprints come on its display; you can clean it with a soft cloth or a cleaning solution.
Read the manual with full attention to understand its functioning; otherwise, it can result in the flickering of its screen.
Secure the screen with bolts
It is better to check the nuts and bolts and secure your product. Many people complain that the screen starts hanging from its site after a few days.
This is common due to loose brackets and stripes. Always tighten them and ensure that everything is fixed correctly.
Use of chain to hang a projector screen on the ceiling
You can also use a chain of different lengths to cling a screen on the roof. You should use a high-quality chain that can bear the weight of your device.
When you are not comfortable with seeing a movie for a long time; Then you should use a chain to slightly lower the device.
To hang it, measures the distance between both the corners and mark them on your roof. Next, place crown bolts according to their measurement. After placing, secure them with a screw wrench.
Now take two chains of equal length, check their capacity to bear weight, and attach them carefully to the bolt.
The snap hooks are attached on both sides of the screen to hang it. Fix them with the hooks of the chain and tighten the screws.
Why would you mount a screen on the ceiling?
Purchasing your projector provides you with the benefits of enjoying different movies at home while sitting on your couch.
You should install it on the ceiling because of its various benefits. For example, You can close its screen when you are not using it to prevent scratches, dirt, and prints.
In addition, you can use it while sitting at your place by using its remote controller.
You can save your room space while mounting them on the ceiling. For example, your large TV table occupies more space so you can replace it with a screen. It also looks attractive and increases your home decoration.
When you are situating it on the table, it can cause an interruption while you are walking. It seems boring; when you are pausing your display again and again. When you place it on the ceiling, it will not cause distraction in the shadow.
Placing it on the ceiling provides better ventilation and the crossing of air. The distance between the display and the wall is about 10 to 30cm. It protects from overheating and short circuits in the wires.
It is comfortable for your eyes because when you are using a wall, it directly reflects light.
Related Articles:
What is the average cost of the projector bulb?
How much does a new projector screen cost?